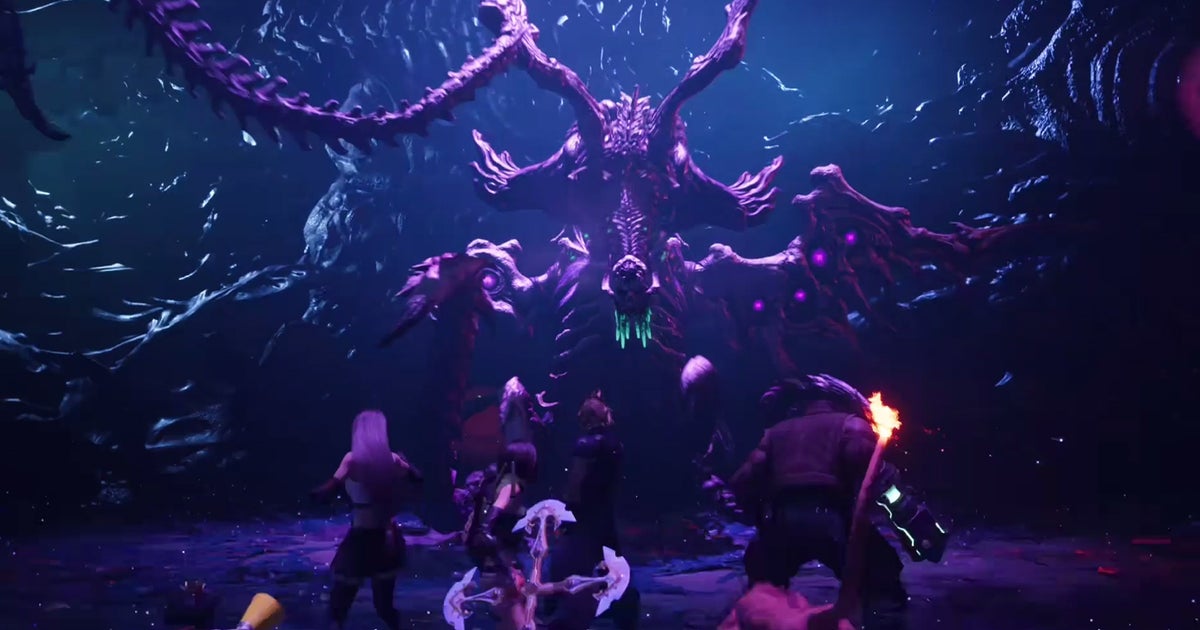
Final Fantasy 7 Rebirth’s fateful conclusion takes place in the Forgotten Capital, the same point as the ending of the original game’s first disc. There you will fight a powerful variant of the alien life form known as Sephiroth’s “mother”, this time with the expanded name of Jenova Lifeclinger.
This fight at the end of Chapter 14 is the first in a long series of battles in the epic finale of Final Fantasy 7 Rebirth. While there are checkpoints between certain bosses (and the party’s HP and MP will recharge), you need to be prepared for the long haul. You will have no opportunities to save or get supplies once you commit to this boss fight.
Don’t worry though, we’ll explain how to beat Jenova Lifeclinger in Final Fantasy 7 Rebirth and how to get your party in shape to take on the full challenge. Beware of spoilers ahead!
In this page:
To view this content, please enable targeting cookies. Manage cookie settings
How to Prepare for Jenova Lifeclinger in Final Fantasy 7 Rebirth
The point of no return in Final Fantasy 7 Rebirth is found at the beginning of Chapter 13 once you embark at Northwood Port to reach the Temple of the Ancients. At this point, you will not be able to level up your party any further or unlock new Materia or equipment for the final battle. As long as you start Chapter 13 at the recommended level of 45, you shouldn’t find yourself at a lower level than Chapter 14.
Once you’re in Forgotten Capital, you’ll have one last chance to rest at a bench, purchase supplies, and upgrade your Folios. You should have a decent surplus of Gil from the Chapter 13 battles, so stock up on plenty of Giga-Potions and Phoenix Downs. If you haven’t already, get the latest gear for everyone in your party.

Image credit: Eurogamer/Square Enix.
For Folios, you may have the chance to unlock the Lv. of each member of the group. 3 Limit Break, but don’t bother doing it at the expense of more useful abilities. Make sure party members have elemental abilities, like Wildfire, unlocked. Since you have to prepare not only for Jenova but also for the fight that comes after, you want to unlock skills and synergy abilities that work between Cloud and Aerith, but also between Tifa, Barrett and Cait Sith, and between Barrett, Yuffie and Red XIII.
It’s important to emphasize that all party members (yes, that includes Aerith too!) must have Materia set up before entering this fight. If you’ve been trading Materia between active party members this entire time, this could leave you at a disadvantage.
Our advice is to spread out your Materia, so, for example, don’t set all elemental Materia spells for a single party member. You have a chance to buy Materia at this last rest stop, but they are all rated one star and you won’t have a chance to upgrade them unless you pair them with Level-Boost Blue Materia. Status spells like Poison and Petrify won’t work on Jenova Lifeclinger, so don’t bother with these. Instead, consider setting up stat-boosting Purple Materia.
Aerith has the most effective magic power, so you can assign her a one-star Healing Materia and she will still be able to help the party with Cure. That means you can prioritize distributing Healing Materia to others. Cloud should have Barrier Materia paired with Magnify so you can cast defensive spells for both Jenova Lifeclinger and the subsequent fight. If you also set it with Item Economizer Materia, you will also be able to use items without using ATB bars from time to time, very useful!
How to defeat Jenova Lifeclinger in Final Fantasy 7 Rebirth
Once the fateful scene is over, you will jump straight into the fight against Jenova Lifeclinger. He will immediately use Contaminant Expel to grab and eliminate half of your party members. Regardless of who you put in your active party, you’re left with Cloud, Tifa, and Red XIII. To start, go all out with Cloud in Punisher mode to deal physical damage. Since Jenova has resistance to ice and wind magic, don’t bother with any spells yet.
Jenova has an AOE attack called Mourning Wail that creates a cyclone around her that reduces HP if you stay within its radius. Jenova follows this with Vengeance, which fires lasers indiscriminately. Avoid damage by nimbly dodging and prepare to retreat when Jenova uses Castigate, which delivers a flurry of blows to the limbs in a forward arc. Don’t keep your distance for too long though, as he can also launch Blizzaga.

Image credit: Eurogamer/Square Enix.
Shortly after, Jenova erects an organic-looking barrier around her. This barrier is immune to physical attacks, so cast spells or use element-based abilities. Be careful as she will continue attacking with Castigate and Azure Resplendence. This sees tentacles shooting out of the ground in front of Jenova, so stay to the side. Taking down the barrier will put Jenova in a pressure state, which is a good time to use Cloud’s Focused Push and Tifa’s Focused Strike to increase the stagger gauge.
When you’ve removed about 15 percent of her HP, Jenova uses Contaminant Expulsion again, this time making Tifa and Red XIII disappear. Cloud will have to fight alone for a while, so be careful to have Item Economizer so you can freely use a Giga-potion to heal yourself or use a spare ATB bar.
Jenova will use the same attacks as above during this phase, so stick with Punisher mode to weaken him and build up ATB, and only use ATB when he raises another barrier. She destroys the barrier with magic and then uses Focused Thrust. You should be able to stagger Jenova and then launch strong attacks as Braver.
Once Jenova’s HP has been reduced to about two-thirds, a cutscene will play and your party members will return, although again you will only have Cloud, Tifa, and Red XIII in the active party. The environment has changed slightly, but Jenova will use similar attacks like Mourning Wail. She will also occasionally teleport across the arena to catch you off guard.

Image credit: Eurogamer/Square Enix.
Jenova also has some new attacks. Dreams of Sorcery sends easy-to-avoid orbs of elemental magic to follow you. Jenova also has a ranged magic attack called Desecration that does much more damage and you only have a moment to get out of her way.
Keep an eye out for the Eye of Providence, which grabs a party member and attacks them with lasers. There’s not much you can do about this, so if you get caught, immediately switch to another party member to perform some attacks and heal your ally if necessary.
Continue the offensive until Jenova has a third of her health and another cutscene will trigger where she will essentially blow up the arena she was standing on into smaller platforms, splitting everyone up. Now you will take turns with different pairs of group members.

Image credit: Eurogamer/Square Enix.
In this sequence you start with Tifa and Cait Sith. Aim for Jenova’s right wing in this phase. Tifa’s quick attacks will charge up her ATB quickly, giving you the opportunity to use more powerful abilities like Dive Kick, although don’t neglect Cait Sith: at least she can call on her Moogle. Keep the offense sustained and you will paralyze the right wing.
The action will then switch to Barrett and Red XIII. This time you should aim for the right wing. Again, use both party members’ abilities, although you’ll get more use out of Barrett’s gun arm for Overcharge, while using Point Blank will be a big hit.
After the left wing has been paralyzed, the action will shift to Cloud and Yuffie, and the focus will be on Jenova’s head. Her head will move frequently, making Yuffie the most useful party member to control in this fight. Throw your shuriken and use recover to get in close and continue dealing melee damage.
Once the head has been crippled, the group joins together for a nice attack sequence. However, even though he claims to have dealt 9999 damage, you actually still have about a quarter of Jenova’s HP left to take him down yourself. This is one tough space monster.

Image credit: Eurogamer/Square Enix.
In this last phase, the active members of the group will be Cloud, Yuffie and Cait Sith. Again, Jenova will use her previous moves but also a couple of more powerful variants like Sanguinary Flames, launching beams of fire at the group. Unfortunately, she is also immune to all physical attacks. The good thing is that any stagger you accumulated in the previous phase will carry over, so it won’t take much more to clear it.
You still have to spend some time doing non-damage attacks just to build up ATB for elemental attacks. However, Yuffie can use her Elemental Ninjitsu ability, so switching to it will allow you to reduce some damage. Hopefully you have a breakout limit saved here. Even if it can’t deal physical damage, it will put Jenova in a pressure state, allowing Yuffie’s elemental chips to stagger. Once Jenova is stunned, you can unleash all your attacks to finish her off.
Jenova Lifeclinger Reward in Final Fantasy 7 Rebirth
Defeating Jenova Lifeclinger will grant you 4400 EXP, 30 AP and 2200 Gil. Money at this point may seem useless, but in reality once you finish the game you can replay the chapters and continue your progress, as well as opt for higher difficulty levels.

Image credit: Eurogamer/Square Enix.
However, the game is not over yet. While in the original game, defeating Jenova marked the end of your time in the Forgotten Capital, Final Fantasy 7 Rebirth has a rather marathon ending in mind. The good thing is that the group’s HP and MP will be restored automatically. You’ll need it too, as you’re about to face another enemy!
Categories: Guides
Source: ptivs2.edu.vn