Resident Evil 7 Bedroom DLC is one of three episodes of Banned Footage Vol 1, offering an additional videotape scenario with our favorite cameraman Clancy in a room escape-style scenario to solve with Marguerite.
You can see how the entire episode is solved in the Resident Evil 7 Bedroom solution video below, or read a step-by-step explanation.
If you’re interested in other banned DLC, our pages on how to get the true ending of Daughters, how to beat Hoffman in Blackjack in 21, and how to finish Nightmare Mode can help you.
A few notes before we begin; There are several puzzles that, when solved, will trigger a timer that sees Marguerite enter the room. During these times, you will have to return the room exactly as it was before. The instructions below tell you things to keep in mind, but keep in mind that you can fail the first time and still play. Later, however, it may mean the end of the game.
Additionally, your choice of conversation prompts does not affect the outcome of the episode, and there are also three hidden Dead Rat locations you can find to unlock an additional trophy or achievement.
Paint Spots in the Resident Evil 7 Bedroom DLC
Pick up the spoon from the tray and then check the lock to free yourself. Pick up the flashlight on the bed next to you, which you will need at all times while exploring to illuminate the room.
The desk on the south side has a few things of interest: a drawer with a note that says “Same time as all other clocks” and a vase with a lighter in it, but whatever drawer you open, close it again.
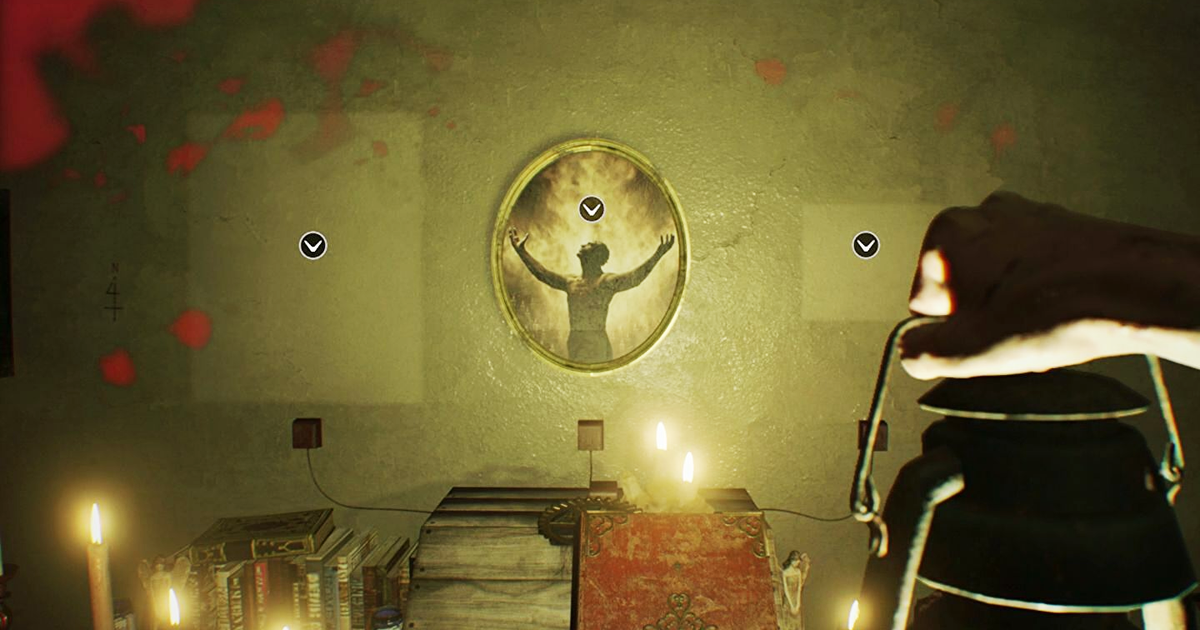
On the western wall there are three marks above a closed book where the paintings should be. Pick up the untitled painting C and place it in the middle. Now to look for the other paintings.

Find the Untitled Painting B in the northeast corner, retrieve it from the wall, and place it on the left side.

Then, try to change the time on the clock next to the bed to receive the broken clock hand.

Note that between these two points is a Dead Rat location.
Use the broken clock hand on the grandfather clock on the north wall for untitled painting A.

The clock will now ring and Marguerite will be alerted. Quickly place this last painting on the wall, so they are in the order B, C, A, then pick up the sewing needle from the book.

Before the timer ends, you must reset the room to how it was before you started. This means that, making sure to close the grandfather clock door and the drawers, readjusting the paintings (replace B in the corner, A in your inventory, and C in the leftmost position), put the flashlight back in the wall and when you get on the bed, press the message to wait for it to put the clamp back into place.
You should successfully avoid her suspicions, but if not and she attacks you, you may have to use the spoon in the restraint to free yourself.
Next, place the sewing needle back on the nightstand clock and set the time to 5:00. The bed will move and a note will fall.

Ignore it for now. She interacts with the clock and moves the bed back. Place the flashlight on the wall and select the “Wait” message on the bed to replace the restraint.
Door Password in Resident Evil 7 Bedroom DLC
If you avoided suspicion correctly, she will come in and give you some food. Pick up the fork and stove, and if you want a dead rat location, use the fork on the food, then investigate the food again from the clock side to find one.
Either way, grab the flashlight and read the note on the ground for some clues:

These clues tell you to place the paintings in this order on the wall (A, B, C) to reveal a new section of the book, a figure with a leaf with a fork and spoon on either side.

This is the clue you need for the door. Investigating each of those items in your inventory will reveal the symbols, so insert them in that order: snake, leaf, apple. The warehouse door will open.

Medusa and the Serpent Shadow Puzzle in the Resident Evil 7 Bedroom DLC
Before you start investigating the rest of the storage room, check the top of the shelves more or less directly ahead to find the third and final Dead Rat location.
Open the bottom of the cabinet using the fork you just picked up to find solid fuel inside.

Return to the other room, go to the corner and remove Untitled Painting B. Combine the solid fuel with the stove and place it there.

Use the lighter (you can find it inside a vase by investigating a desk on the south side of the room) to kill the bugs. Now investigate the bottle, spin it until the Corkscrew appears, then take it out.
Now you have to hide again. Take the stove and put it back in your inventory, and place the Untitled Painting B in its place. Place the flashlight on the wall, get on the bed, and select Wait to put on the restraint.
When the coast is clear, get out of bed and use the corkscrew on the lantern hooks (it’s the top half of each one) next to the bed and at the other end of the storage room.

Doing so will give you two lantern hooks, which you can combine to make an iron figurine.
Next, investigate behind the desk on the south side of the bedroom to find a knife hidden against the wall.

Use the knife on the box secured with red tape in the storage room to open it. Place the flashlight inside.
There are two pedestals in this storage room for the Medusa and Snake shadow puzzle. Use the iron figurine on the one closest to the painting and rotate it until it looks like a Medusa.

Then, use the fork on the one closest to the light source to make the snake head.

Now, the bird cage will open and the Snake Key will be yours. You will hear Marguerite enter the next bedroom. She equips the knife for you to hold in your hand, then enter the room, where the cutscene will play and you will automatically plunge it and stun her momentarily.

It’s time to escape. She quickly investigates the clock next to the bed to move the bed once more and open a path to the door, and use the snake key (use it on the left side, when the message appears) and jump. Go down the steps to finish the chapter.
Categories: Guides
Source: ptivs2.edu.vn