Destiny: Rise of Iron makes a clear callback to the first weapon players wield in the game, the Khvostov, by turning it into the Khvostov 7G-OX exotic weapon. The path to get there isn’t marked in the game, but once you’re on the Khvostov Quest in Rise of Iron, it will only take you about an hour to 90 minutes to get there, although expect some exploration and a difficult boss. battle before doing so.
Once you’re done, you might want to take on another exotic: perhaps Gjallarhorn Quest, Thorn Quest, or Outbreak Prime Quest? – which are required to complete an entry in the Rise of Iron Logbook.
How to get Khvostov’s quest ‘We found a rifle’ in Destiny: Rise of Iron
First, you need the Khvostov 7G-OX schematic to unlock the quest line. There are two ways to do this:
- Dismantle Khvostov’s original weapon.
- Use an Intel Relay Splicer to board the Ketch ship in the Plaguelands
If you managed to keep that weapon since 2014, then great: take it out of your Vault, disassemble it, and continue to the next step. Of course, most people got rid of it as soon as possible and fortunately, there is another way to get the Khvostov 7G-OX scheme.

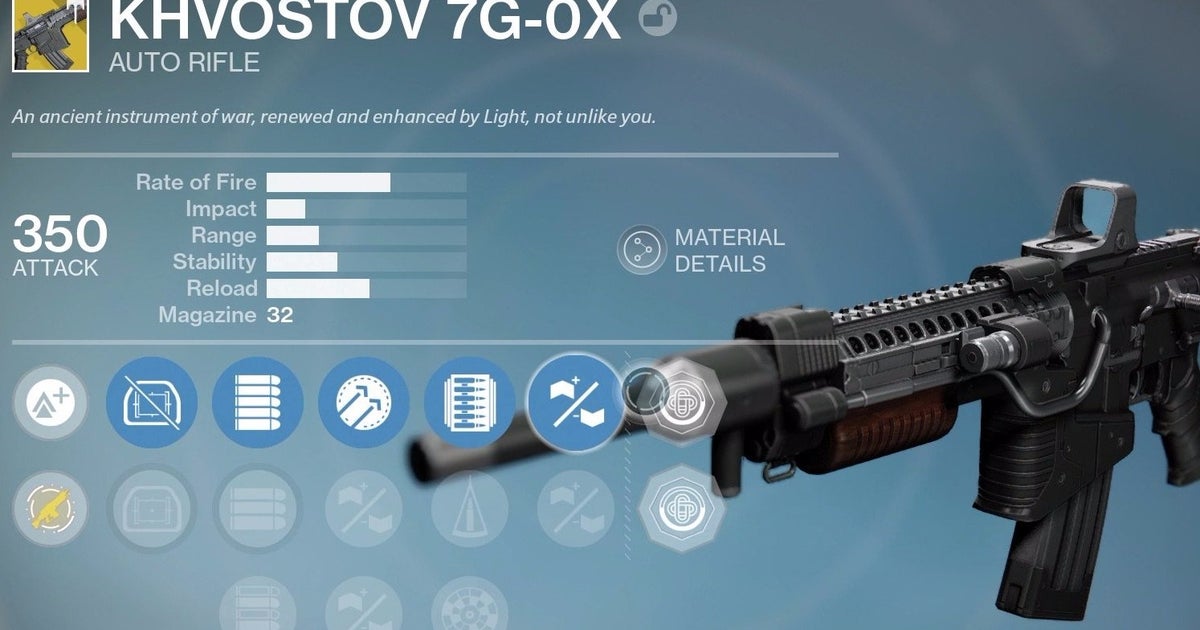
Here is the Khvostov 7G-OX up close.
You need to head to the place where you started Destiny, just outside the walls of the Cosmodrome. Power up The Plaguelands patrol (complete the game’s final story mission, The Iron Tomb, to access it) and head back in the direction of Rocketlands (from where you spawn, go right, through the door on the walkway superior). Once in Rocketlands, turn left into The Divide, then turn left at the corner into the sewers to access The Breach.
You need to make sure you have an Intel Relay Splicer with you, because before you can get out of the wall, you’ll have to open a door in The Breach. (Note that this won’t work if you try to access the ship from The Walls Come Down story; we tried.)
Once you do, make your way through the pile of cars to the Ketch ship in the distance and kill everything on board, including a rather persistent Servitor Pilot. Once solved, a chest will appear on the far right containing the 7G-OX Khvostov schematic.
Whichever way you get it, take it to the Iron Temple to continue with the next part of the quest.
How to complete the ‘We Found a Rifle’ quest, manual page locations and Khvostov weapon parts
Now you have to locate 10 man pages and 3 weapon parts while you are patrolling in the Plaguelands area.
10 Manual Pages for Khvostov 7G-OX – Obtained by killing fallen enemies within the Patrol, so kill everything you come across and they will appear from time to time. For some players, this step was pretty quick, with a constant stream of drops, but for us it took a while. We also had more success when we weren’t doing patrols, but you can do other things at the same time: we had two drops in a single session of Acheon’s Forge, for example. In short, you can get most of these pages while getting weapon parts and then stay on Patrol until you’re done.
3 Weapon Parts for Khvostov 7G-OX – These three weapon parts are found in specific locations. Start The Plaguelands and return to the Rocketyards, which will act as your starting point. From here, you need to go to the Refinery and essentially take the route that Devil’s Lair Strike takes you on. Two of the three weapon pieces are found on this route:
1. One is located in the room after you face waves of enemies when your Ghost opens the door, on the right side of the corner.

The first part of the weapon in the mission “We found a rifle.” Please ignore the photobombing dancer.
2. Next is in The Blast, the vast area where you face the Walker, outside in the center of the map, against the purple tube.

The second part of the weapon is outside, near where you fight the Walker in Devil’s Lair Strike.
3. For the third part of the weapon, return to the Rocketyard and head in the other direction to reach The Divide. Instead of going left to The Breach, go right to Dock 13 (as if you were going to the place where you spawn in the Cosmodrome in the original Patrol). After the big room with the enemies, the gun part is under the stairs.

Look under the stairs in Dock 13 for this third part of the weapon.
Once you have 10 man pages and 3 weapon parts, return to the Iron Temple to complete a quest that will end the Quest.
Complete Khvostov’s quest ‘We Found a Rifle’ in Destiny: Rise of Iron
This final mission of A Khvostov Rising hosts a particularly difficult boss encounter. Make sure you’re of a decent level (our article on how to reach Light level 400 can help you) and come equipped with something that can knock down a Void shield and deal heavy follow-up damage. If possible, also team up with one or two other players.
Start the mission, use your Ghost at the scan point and then exit to meet Kaviss. As mentioned, he’s pretty tough, so take down his shield with a Void Heavy or Super, then follow up with faster damage. When his health is low enough, he will retreat. Head to The Breach, where you’ll find a SIVA cloud path through the tunnels, and watch out for traveling mines along the way.
When you reach the wide, snow-filled area, head to the upper hallway at the other end to begin another battle with the Captain.

Kaviss is pretty tough, so make sure you have a powerful Void attack to take down his shield.
Again, the same rules apply as before: use a Void Heavy or Super to quickly drop his shield and then follow up with the opposite one or something else to deal some damage. The problem here is the number of enemies around; The two things you mainly need to watch out for are the Servitors on the walkways (a few sniper shots will take them out) and the dropships that appear occasionally.
Wait until the ships disappear before heading out into the light (we had to ‘get close’ to them to make them move once, so keep that in mind if they don’t move) and try to take out as many regular enemies as you can. Then, when the coast is mostly clear, he comes in with a Super/Heavy combo to take down a portion of the Captain’s health, then retreat and repeat the process. It’s a tough battle alone and will definitely be easier with some of you, so consider forming a party if you can.
Want more Destiny: Rise of Iron guides, tips, and tricks? Then read our Wrath of the Machine walkthrough and guides, full list of all idle SIVA group locations, tips on how to reach maximum Destiny Light level, how to complete Exotic Gjallarhorn Quest, Khvostov 7G-OX Quest and Thorn Quest and the new Vanguard modes. Elite Strike and SRL Score.
Once Kaviss is knocked down, he will immediately drop the Khvostov 7G-OX as an Engram, which you can equip immediately.
However, we are not done with the mission yet; Go beyond the wall, where you started the game and the new Ketch ship is, and eliminate all the fallen along the way. Once you’ve taken out all the enemies on the ship, your Ghost will want to chat with you while he admires the view. Once you’ve finished the cutscene, he returns to the Tower and talks to Shiro-4 to complete the mission.
Categories: Guides
Source: ptivs2.edu.vn